Formatting Equations
Sometimes, you need to write mathematical equations in your professional document. In 199, we will do this using the following instructions.
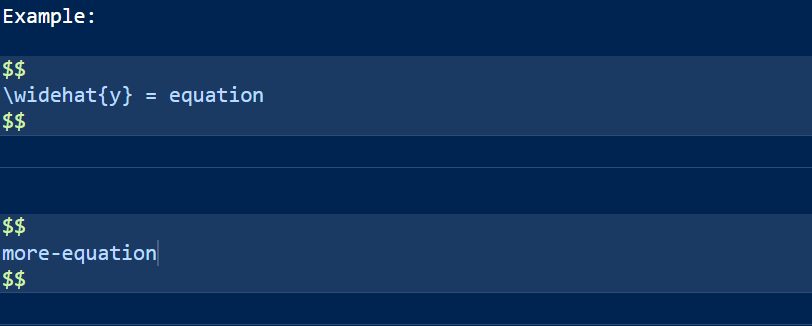
When you want to write an equation, we are going to specify “latex chunk” using two dollar signs to start a chunk, and again two dollar signs to end a chunk.

Note: In order for this to render correctly in a pdf, we must do the following:
– What we write must go DIRECTLY underneath the $$. There can be no whitespace between what you first write and the start of the chunk.
– The last line that you write must have the $$ DIRECTLY underneath. There can be no whitespace between where your text ends and when the chunk ends.
If you do not follow these rules, you will not be able to render.
Additionally, we highly suggest that you work in the Source tab if you are writing equations. You may not be able to render if you switch between visual and source mode. R can get confused on if you want just the $ symbol, or if the symbol actually is representative of a latex chunk. If R thinks you just want the symbol, it will force a backslash behind your $ symbol

Output:
\[ \widehat{y} = equation \]
Unfortunately, the rendered PDF will not recognize the double backslash, and return your equation to a new line within the $$ chunk. Thus, if you your equation is going off the page, simply create a new latex chunk.

Output:
\[ \widehat{y} = equation \]
\[ more-equation \]
The same goes for writing indicator functions. Create a new latex chunk and follow the rules outlined above:

Output:
\[ level = \begin{cases} 1 & \text{if condition is met}\\ 0 & \text{else} \end{cases} \]
Note: the \\ is recognized in this latex chunk because of the cases environment. More on this in the next section if you are interested.
Create a latex chunk for each indicator function you write.
This is not a latex course, and the above information will suffice on how to format your equations nicely.
Extra Information for those that want to learn more Latex
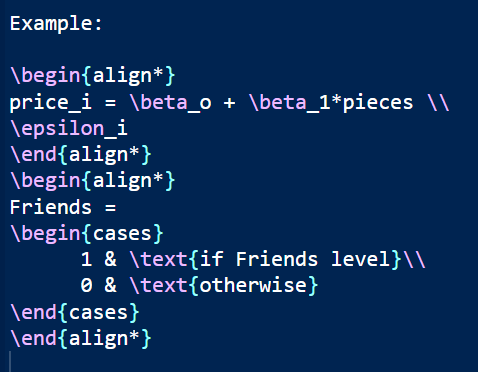
We can provide latex environments to make equation writing easier. For example, we can create an environment that actually allows us to have linebreaks. This can be achieved in the align environment. In this environment, we can use (&) for alignment and a double backslash to insert a linebreak.

In the above example, the \\ will be recognized, and \(\epsilon_i\) will be returned to a new line.
Output:
\[\begin{align*} price_i = \beta_o + \beta_1*pieces + \\ \epsilon_i \end{align*}\]
Much like up above, if you wanted to add an indicator function to this fake example, you could call for a new align environment:

Output:
\[\begin{align*} price_i = \beta_o + \beta_1*pieces + \\ \epsilon_i \end{align*}\] \[\begin{align*} Friends = \begin{cases} 1 & \text{if Friends level}\\ 0 & \text{otherwise} \end{cases} \end{align*}\]
Again, notice how there is NO whitespace when the environment is called, or when we end the environment.
